 (Image Source: MyDrivers.com)
Recently, I lost access to my job laptop, which I used occasionally for small personal tasks. Although, that was not a priority, being close to November, I thought it would be a good time of the year to get a new one, and so began my search.
Having used a recent MacBook Pro with an M2 Pro chip, I was a bit spoiled and was not ready to downgrade too much on some aspects. I settled on these specifications:
- Efficient CPU
- Great battery life
- No dual graphics
- High-quality metal frame
- High-resolution 14-16” screen
- Great on Linux
The first three criteria really defined my search. I’m not ready to get a new MacBook; they are way too expensive for my needs, and I dislike macOS. So, back to x86. Yes, there’s Asahi Linux, but I’m not comfortable relying on Apple’s willingness to let the project continue. Plus, Intel CPUs have really weak GPUs. AMD recently started selling Zen4 laptop CPUs, and those are terrific: https://www.phoronix.com/review/amd-ryzen7-7840u
Being located in Canada, my options were quite limited. First, Lenovo makes a couple of interesting models:
- Lenovo ThinkPad T16 Gen 2
- Lenovo ThinkPad P16s Gen 2
- Lenovo ThinkPad P14s Gen 4
However, none of them really attracted me, plus they were a bit expensive, so I continued looking until I stumbled upon the Framework laptop 13 with Ryzen 7040. That one looked almost perfect for me, however, it was (at that time), only available through pre-orders.
Finally, another option I found was with Xiaomi: the Xiaomi Redmibook Pro 15 2023.
The drawbacks being that it only has 16 GB of RAM (soldered…) and that it’s not available in North America. I would have to buy it directly from China at an inflated price, which also means, probably losing the warranty and dealing with a long, and risky shipping.
So, I got it on Singles’ Day for $706.20 USD, or $621.46 USD after cashback, which is about $844 CAD, plus some taxes and brokerage fees. I know the laptop might be available for cheaper in China, but I’m still pretty satisfied with the price I paid.
https://wccftech.com/xiaomi-redmibook-pro-15-best-amd-phoenix-laptop-ryzen-7-7840hs-670-usd/
Specs
| CPU | AMD Ryzen 7 7840HS |
|---|---|
| GPU | AMD Radeon 780M |
| Memory | 16 GB DDR5-6400 |
| Display | 15.60 inch 8:5, 3200 x 2000 pixel 242 PPI, 120 Hz, HDR |
| Storage | 512 GB NVME |
| Connectivity | 1 USB B 3.0, 2 USB C 3.1, HDMI, 3.5mm audio, microSD |
| Networking | Wi-Fi 6 + Bluetooth 5 |
| Battery | 72 Wh with 100W GaN charger |
| Weight | 1.78 kg |
Installation
Info
Most of this guide also applies to The Framework laptop 13, the Lenovo models listed above, and perhaps a few other computers.
I have used many Linux distributions over the year, but for a personal computer, I settled again on ArchLinux. ArchLinux is by no means appropriate for everyone, but I love it since it allows me to customize my installation to the point that I understand the role of everything installed. It’s even more critical for a laptop where I want to control what runs in the background to achieve the best possible battery life. One day, I will consider switching to a reproducible distro, something based on Nix or Guix, but that will be for another time. So for now, I will rely on notes (that you are currently reading) to remember the important bits of my setup.
I’ve been using ArchLinux since at least 2011. At that point, Arch came with an installer, which I used for my very first installation, before it got dropped, until very recently, when the newer archinstall got introduced again in the image. Therefore, I’m used to configuring ArchLinux manually, but given it’s available, I decided to try the new tool.
The installer is actually pretty decent and simple, and is appropriately documented, so I won’t go too much over it. I chose:
- Enable multilib (primarily for
steam-native-runtime) - PipeWire over PulseAudio
- Selected my locale
- And:
Sector size
I always realize this too late; this step has to be done before running archinstall. By default, many modern SSDs, including the one in this laptop, report a smaller sector size than their optimal one. This is done for compatibility with Windows XP and older systems…
❯ sudo nvme id-ns -H /dev/nvme0n1 | grep "Relative Performance"
LBA Format  0 : Metadata Size: 0   bytes - Data Size: 512 bytes - Relative Performance: 0x2 Good (in use)
LBA Format  1 : Metadata Size: 0   bytes - Data Size: 4096 bytes - Relative Performance: 0x1 Better
Follow the procedure here to switch to the proper sector size. This will erase the drive. https://wiki.archlinux.org/title/Advanced_Format#NVMe_solid_state_drives
zram
I will probably revisit this subject in the future since it is so complex. Linux’s memory subsystem is where the most involved finetuning can happen. Having a swap is a good idea since it enables Linux to keep more disk pages in cache. It is especially essential with this laptop since it only has 16GB of RAM. One way to maximize this small amount of RAM is to use compression. Application pages can usually be highly compressed, leaving more space available for actively running stuff. It is worth noting that both Windows and macOS use a compressed swap by default as well nowadays. Two mechanisms exist on Linux to implement a compressed swap: zram and zswap. zswap is a compressed RAM cache for swap pages, while zram is a thin-provisioned compressed block device that can be used as a swap. The main difference between the two is that zswap requires using another swap device. On a laptop we want to avoid using a disk swap even more since the additional disk access will kill battery life. I have also anecdotally seen many reports that zswap is much slower than zram, and that reflects my experiences as well, but most were long ago, and unscientific, so don’t quote me here.
zram can simply be enabled in archinstall.
btrfs
There are a couple of good file system options, but I chose btrfs for a couple of reasons. Subvolumes work in practice, like more convenient partitions, snapshots are incredibly useful for backups (more on that later) and compression can save quite a bit of space on the not-so-big included SSD, which also reduces wear.
The default archinstall configuration is well-made, and I went for it.
Post-installation
SSH
The first thing I did after installation was to configure SSH, so that I can access my desktop from my new laptop, and vice versa.
❯ sudo pacman -S openssh
❯ ssh-keygen -t ed25519
❯ echo "AddKeysToAgent yes" >> .ssh/config
❯ systemctl --user enable --now ssh-agent.service
❯ export SSH_AUTH_SOCK="$XDG_RUNTIME_DIR/ssh-agent.socket"
Then exchange keys between the computers and add the new one to GitHub. One line will need to be added to .zshrc_thispc below.
CachyOS
This laptop supports AVX512 and other advanced performance features part of the so-called x86-64-v4 architecture level. Distributions need to at least recompile and provide copies of all their packages to support these newer features, so most don’t. ArchLinux official mirrors for instance only support x86-64-v1 as of today. CachyOS is an ArchLinux-compatible distribution that focuses on performance. Its repositories can be added to ArchLinux, and they target up to x86-64-v4.
I also noticed that CachyOS repositories include packages that I commonly use but are not available on ArchLinux official repositories, such as oh-my-zsh.
reflector
reflector is a tool to filter and rank ArchLinux mirrors. After running this step, pacman can actually max out my 1.5 Gbps connection. Although this step is primarily an optimization, I like doing it early since I will have many packages to download. It’s also useful to automate your mirror management, as one of your mirrors going down could otherwise unexpectedly affect your ability to download fast.
❯ sudo pacman -S reflector
❯ cat /etc/xdg/reflector/reflector.conf
--save /etc/pacman.d/mirrorlist
--protocol https
--country Canada,US
--age 12
--sort rate
--connection-timeout 1
--download-timeout 3
--verbose
❯ sudo systemctl enable --now reflector.timer
paru
paru is currently my favourite AUR helper, and it’s packaged by CachyOS:
❯ sudo pacman -S paruIts configuration is included in my dotfiles.
dotfiles and zsh
To backup and sync my dotfiles across computers, I use the approach from this article: https://www.atlassian.com/git/tutorials/dotfiles
First, install git and its associated tools:
sudo pacman -S git git-lfs diff-so-fancyThe dotfiles are stored on a public git repository: https://github.com/jdecourval/dotfiles
In my setup, the generic .zshrc and .zprofile dotfiles include computer-specific versions. Create those files:
touch $HOME/.zshrc_thispc
touch $HOME/.zprofile_thispc
Add the export line from the SSH section above to .zshrc_thispc.
Install ZSH:
❯ sudo pacman -S zsh zsh-completions zsh-autosuggestions zsh-theme-powerlevel10k oh-my-zsh-gitChange the default shell:
chsh -s /usr/bin/zshBackups
For local-user owned config files, use the approach described in the dotfiles and zsh section.
Otherwise, I use btrbk for backups. This tool works amazingly well thanks to its use of btrfs. Backups are atomic (because of snapshots) and very fast (it only sends the diff and compress it with zstd). The very latest backups are kept locally, while the older ones are moved to my server.
transaction_log            /var/log/btrbk.log
ssh_identity               /root/.ssh/id_ed25519
ssh_user                   btrbk
ssh_compression            no
backend_remote             btrfs-progs-sudo
stream_buffer              256m
snapshot_create            always
snapshot_preserve_min      5h
snapshot_preserve          5h 0d 0w 0m 0y
target_preserve_min        no
target_preserve            5h 5d 0w 5m 0y
stream_compress            no
stream_compress_level      4
stream_compress_threads    0
stream_compress_long       27
stream_compress_adapt      no
send_compressed_data       yes
timestamp_format long
volume /mnt/btr_pool
  snapshot_dir @.snapshots
  target  ssh://192.168.0.100/srv/backups/laptop
  subvolume @
  subvolume @home
For this config to work, the laptop’s root user has to generate an ed25519 SSH key and add it to the server’s btrbk account’s authorized_keys.
I only back up the root (@) and home subvolumes. The other subvolumes are therefore excluded, including the default archinstall supplied @log and @pkg. To exclude additional folders, proceed like this:
❯ cd /mnt/btr_pool
❯ sudo btrfs subvolume create @home-jerome-nobackup
❯ sudo mkdir @home-jerome-nobackup/.cache
❯ sudo chown jerome:jerome @home-jerome-nobackup/.cache
❯ chmod 700 @home-jerome-nobackup/.cache
❯ cd
❯ mv .cache/* /mnt/btr_pool/@home-jerome-nobackup/.cache
❯ rm -rf .cache
❯ ln -s /mnt/btr_pool/@home-jerome-nobackup/.cache
It makes sense to exclude heavy folders that contain stuff that can be easily downloaded back, like Steam games.
❯ ls /mnt/btr_pool
@  @home  @home-jerome-nobackup  @log  @pkg  @.snapshots
❯ ls -la /mnt/btr_pool/@home-jerome-nobackup
total 16
drwxr-xr-x 1 root   root    80 Apr 22 10:49 .
drwxr-xr-x 1 root   root    92 Dec  2 11:11 ..
drwx------ 1 jerome jerome 752 May  1 17:59 .cache
drwxr-xr-x 1 jerome jerome 314 Apr 26 16:27 Downloads
drwxr-xr-x 1 jerome jerome  18 Apr 25 16:42 pkgbuilds
drwxr-xr-x 1 jerome jerome 18 Apr 22 10:50 prog-online
drwx------ 1 jerome jerome 954 Apr 22 10:53 Steam
Enable the timer
❯ sudo systemctl enable --now btrbk.timerUsability
Hyprland, waybar, wayland and user session
I’m currently using Hyprland as my window manager. It’s a dynamic tiling Wayland compositor, reminiscent of my old favourite: awesomewm. To get to something that resembles a true desktop environment, a few more packages are needed:
hyprland: Window manager.hyprpaper: Wallpaper.waybar: A “bar”.xdg-desktop-portal-hyprland: Implement a few APIs that rely on the compositor, like screen sharing.xdg-desktop-portal-gtk: Fallback for what’s missing inxdg-desktop-portal-hyprland, like the file picker API.nwg-drawer: Application menu.swaync: Notification centre.gammastep: Night mode.network-manager-applet: To control networks fromwaybar’s tray.pantheon-polkit-agent: Very lightweight daemon to handle privileged requests (think launching your VPN).blueman: Bluetooth management.kitty: Graphical terminal emulator.qt6-wayland: To enable Qt apps to work natively on Wayland.qt5-wayland: To enable Qt apps to work natively on Wayland.brightnessctl: So that the keyboard brightness buttons work.flameshot: To take screenshots.grim: To take screenshots.pavucontrol: Sound mixer.wl-clipboard: Clipboard management from the command line.
All those tools are configured by my dotfiles. To start the environment, one can simply launch Hyprland from a VT, but I want this to be automated at boot. I use .zlogin for this. I like adding my environment variables that are specific to the WM in this file instead of .zprofile, so that if I change my WM, everything is in the same place.
❯ sudo pacman -S hyprland hyprpaper waybar xdg-desktop-portal-hyprland xdg-desktop-portal-gtk nwg-drawer swaync gammastep network-manager-applet pantheon-polkit-agent blueman kitty qt6-wayland qt5-wayland brightnessctl flameshot grim pavucontrol wl-clipboard
❯ touch .config/hypr/hyprland.conf.local
❯ cat .zlogin
 if [[ -z $DISPLAY ]] && [[ $(tty) = /dev/tty1 ]]; then
    export XKB_DEFAULT_LAYOUT=ca
    export XKB_DEFAULT_VARIANT=multix
    export XKB_DEFAULT_MODEL=pc104
    export CLUTTER_BACKEND=gdk # https://github.com/flathub/org.gnome.Maps/issues/10
    export SDL_VIDEODRIVER=wayland
    export XDG_SESSION_TYPE=wayland
    export QT_QPA_PLATFORM=wayland
    export MOZ_ENABLE_WAYLAND=1
    export LIBSEAT_BACKEND=logind
    export _JAVA_AWT_WM_NONREPARENTING=1
    export QT_WAYLAND_DISABLE_WINDOWDECORATION=1
    exec systemd-cat -t Hyprland Hyprland
fi
Font configuration
Font rendering is much better than when I started using Linux, so I won’t need to do much. Just install a few basic fonts, configure them, and enable 09-autohint-if-no-hinting.
The fonts I chose:
noto-fonts: Good-looking all-around fontsnoto-fonts-cjk: We are in 2024, I can spare a few bytes and be able to render CJK characters online.noto-fonts-emoji: For emojisttf-liberation: Fonts metric-compatible with Microsoft fonts.ttf-firacode-nerd: Great monospace font that is suitable both for terminals and IDEs.
❯ cd /etc/fonts/conf.d
❯ diff -q /etc/fonts/conf.d/ /usr/share/fontconfig/conf.default
Only in /etc/fonts/conf.d/: 09-autohint-if-no-hinting.conf
Only in /etc/fonts/conf.d/: README

❯ cd ..
❯ cat local.conf
<?xml version='1.0'?>
<!DOCTYPE fontconfig SYSTEM 'fonts.dtd'>
<fontconfig>
    <match target="pattern">
        <test name="family" compare="eq">
            <string>FiraCode Nerd Font</string>
        </test>
        <edit name="style" mode="append">
            <string>Retina</string>
        </edit>
    </match>

  <alias>
    <family>serif</family>
    <prefer><family>Noto Serif</family></prefer>
  </alias>
  <alias>
    <family>sans-serif</family>
    <prefer><family>Noto Sans</family></prefer>
  </alias>
  <alias>
    <family>monospace</family>
    <prefer><family>FiraCode Nerd Font</family></prefer>
  </alias>
</fontconfig>
Bluetooth
The Linux laptop experience certainly improved in the last few years. I was impressed how easy this part was as compared to last time.
- Install
blueman(already done above). - Enable the service.
❯ sudo systemctl enable --now bluetooth- Add to hyprland (this is already in my dotfiles).
exec-once = blueman-applet
exec-once = blueman-tray
- Disable auto power-on:
- Right-click on the tray icon →
Plugins→PowerManager→Configuration - Switch
Auto power-onto off.
Some packages
And let’s finish with a few must-have graphical programs.
- Image viewer:
geeqie - PDF viewer:
evince-no-gnome - Web browser:
firefox - Office suite:
libreoffice-still
Bugs
I got this laptop quite early. Both in terms of not short after its release, but also in terms of kernel support. Initially, I had to work around a few bugs, but by now, almost all of them have been fixed upstream. So I highly recommend using a recent kernel with this laptop.
Wi-Fi and Bluetooth
Status
Fixed upstream, upgrade your kernel.
Although the Linux kernel has a perfectly working driver for the laptop’s Wi-Fi chip, the chip’s PCI vendor ID is not recognized. It’s not too hard to work around this by patching and compiling the module, I’ve had to do that for cheap weird USB Wi-Fi chips in the past, but thankfully here, it’s not necessary if you can upgrade to the not-yet-released now released kernel 6.7 which includes the fix.
https://patchwork.kernel.org/project/linux-wireless/patch/[email protected]/#25485296
suspend-then-hibernate
Status
Fixed upstream, upgrade your kernel.
I’ve read that suspend-then-hibernate didn’t work initially, but I never checked as for me, the standard s2idle sleep battery drain is very low anyway. If you can, upgrade your kernel, as this has been fixed upstream: https://lore.kernel.org/linux-kernel/[email protected]/
Otherwise, a hack is available here: https://github.com/systemd/systemd/issues/24279#issuecomment-1214419650
But a better approach, is probably to set the kernel parameter rtc_cmos.use_acpi_alarm=1.
PSR
Status
Still ongoing.
This laptop’s monitor is equipped with the Panel Self Refresh technology. This technology helps the laptop conserve power by removing the explicit need for the GPU to send periodic refresh commands. The benefit should be even stronger with this laptop’s high refresh rate panel. The feature doesn’t seem to work, however. powertop shows periodic wakeups in the GPU driver even when idle, dmesg shows errors that seem related, and finally, the driver reports the feature as unsupported.
❯ sudo mount -t debugfs none /sys/kernel/debug
❯ sudo sh -c 'grep . /sys/kernel/debug/dri/0/eDP-1/psr*'
/sys/kernel/debug/dri/0/eDP-1/psr_capability:Sink support: yes [0x01]
/sys/kernel/debug/dri/0/eDP-1/psr_capability:Driver support: no
/sys/kernel/debug/dri/0/eDP-1/psr_residency:0
/sys/kernel/debug/dri/0/eDP-1/psr_state:0
I opened a bug report: https://gitlab.freedesktop.org/drm/amd/-/issues/3027#note_2209001
VRR
Status
Fixed upstream, upgrade your kernel.
Variable refresh rate works, but seems to sometimes trigger some bugs like rare screen flickering after going out of sleep, or mouse lag. The mouse lag has been fixed recently on Linux: https://gitlab.freedesktop.org/agd5f/linux/-/commit/66eba12a5482b79ed8cc45ae6f370b117b8e0507 And the flickering as well, fixed starting from 6.8: https://gitlab.freedesktop.org/drm/amd/-/issues/3097 You can find the whole discussion here: https://gitlab.freedesktop.org/drm/amd/-/issues/2186
Battery charge limit
Status
Probably not a bug.
The battery controller does not expose any way to limit the battery capacity or charge current. Neither does the BIOS. I don’t know whether this is a hardware limitation or a Linux driver issue.
Fingerprint reader
Status
Still ongoing.
The fingerprint reader is not supported under Linux, and will probably never be.
It’s USB ID is 27c6:589a.
https://gitlab.freedesktop.org/libfprint/wiki/-/wikis/Unsupported-Devices/
Clock jump
Status
Fixed upstream, upgrade your kernel.
I’ve had the RTC jump to year 2077 after the laptop resumed from sleep. At first, I did not bother looking into this at first given it’s pretty rare and can be easily worked around by doing:
❯ timedatectl set-ntp false
❯ timedatectl set-ntp true
When this happens, I get this log in the kernel ring buffer:
Unable to read current time from RTC
or
mach_set_cmos_time: RTC write failed with error -22
Probably fixed by this: https://lore.kernel.org/all/[email protected]/T/#m55e9858cccb261c8a0fbf721599a768fc7a61ba8 I’ve indeed not experienced the bug in a long time.
CPU frequency
Status
Fixed upstream, patch your kernel or upgrade to staging.
amd_pstate used to use the wrong “high performance value” for some CPU. The bug has been fixed in this commit. lscpu ouputs:
❯ lscpu
Architecture:             x86_64
  CPU op-mode(s):         32-bit, 64-bit
  Address sizes:          48 bits physical, 48 bits virtual
  Byte Order:             Little Endian
CPU(s):                   16
  On-line CPU(s) list:    0-15
Vendor ID:                AuthenticAMD
  Model name:             AMD Ryzen 7 7840HS w/ Radeon 780M Graphics
    CPU family:           25
    Model:                116
    Thread(s) per core:   2
    Core(s) per socket:   8
    Socket(s):            1
    Stepping:             1
    Frequency boost:      enabled
    CPU(s) scaling MHz:   27%
    CPU max MHz:          4350.0000
    CPU min MHz:          400.0000
[...]
The bug report lists:
AMD CPUs with Family ID 0x19 and Model ID ranging from 0x70 to 0x7F series
as being affected, which matches with lscpu. The reported CPU max MHz is indeed wrong, it should be 5100 MHz. After the patch, lscpu reports:
❯ lscpu
[...]
CPU max MHz:          5137.0000
Unknown
Status
Still ongoing.
I have these errors reported by dmesg. I’m not sure what is the cause or what impact this has, if any.
[81519.034311] ACPI BIOS Error (bug): AE_AML_BUFFER_LIMIT, Index (0x000000012) is beyond end of object (length 0x12) (20230628/exoparg2-393)
[81519.034320] ACPI Error: Aborting method \_SB.A032 due to previous error (AE_AML_BUFFER_LIMIT) (20230628/psparse-529)
[81519.034323] ACPI Error: Aborting method \_SB.ALIB due to previous error (AE_AML_BUFFER_LIMIT) (20230628/psparse-529)
[81519.034325] ACPI Error: Aborting method \_SB.PCI0.LPC0.EC0.SVRP due to previous error (AE_AML_BUFFER_LIMIT) (20230628/psparse-529)
[81519.034327] ACPI Error: Aborting method \_SB.PCI0.LPC0.EC0._Q93 due to previous error (AE_AML_BUFFER_LIMIT) (20230628/psparse-529)
Optimization
The first thing we need to ask before ourselves before optimizing a system is to determine what we are trying to improve, and where we can compromise. Here, I want, in order:
- Long battery life
- Responsiveness
- High throughput
This means I’m willing to compromise on, say, how long it takes to compile Linux, if I can complete the task using less battery. It’s not even always necessary to compromise in such ways since most tuning can be toggled depending on the charger’s status.
makepkg
For locally built packages, I optimized makepkg’s build flags. The main one is -march=native. It tailors locally built packages to the current machine, which is fine for me since I never move binaries or packages between my machines. Additionally, I make sure to use all core while compressing, and I add some experimental compiler and linker flags. Comes with the dotfiles.
BTRFS filesystem
Maintenances
SSDs use NAND memory, which has a very particular performance characteristic that Wikipedia describes better than I could:
NAND flash memory cells can be directly written to only when they are empty. If they happen to contain data, the contents must be erased before a write operation. An SSD write operation can be done to a single page but, due to hardware limitations, erase commands always affect entire blocks;[11] consequently, writing data to empty pages on an SSD is very fast, but slows down considerably once previously written pages need to be overwritten.
The solution to this is to have the operating system issue TRIM commands to garbage collect empty pages. With btrfs, there are three ways:
-
Mount the filesystem with
discard
Simply horrible. This issues a TRIM command right after a file extent is freed, which is highly inefficient as this amplifies IO. -
Mount the filesystem with
discard=async(default)
Great in most use cases. The filesystem accumulates pages, and issues batched TRIM asynchronously. -
Issue periodic TRIMs
Finally, garbage collection can happen totally outside of IO paths by simply doing it periodically, say once a week. This results in the least amount of write amplification, but this approach could underperform when disks operate close to their capacity. For a laptop, this is the approach I chose to TRIM my drive.
btrfs maintainers also suggest to periodically run balancing, and scrubbing maintenances. ArchLinux bundles timers for both. Let’s enable all of that:
sudo systemctl enable [email protected] [email protected] fstrim.timerFollowing the @ is the path to the btrfs file system to take care of, with / replaced by -.
fstrim and btrfs-balance are usually fast, but btrfs-scrub can take some time to complete. This is probably premature optimization considering this runs only once a month, but we can make sure that this doesn’t run on battery by doing:
sudo systemctl edit [email protected]And add:
[Unit]
ConditionACPower=true
Compression
Compression is one of the reason I picked btrfs. Tuned properly, the feature can not only save space, but actually improve performance. For this, the proper compression algorithm, and level must be picked. The optimal choice depends upon the:
- Type of disk Slower disks favour higher compression.
- CPU speed Faster CPU can lower compression induced latency.
- Access pattern A server CPU starved, or serving compressed media will not benefit much from compression, while a powerful gaming PC will typically have idle cores available to handle the highly compressible game assets.
To help me decide, I started from https://gitlab.com/hartang/btrfs-compression-test, then modified the script to remove the call to dnf, removed the zlib test to save some time, and added an explicit -T1 to zstd since lzop is not multithreaded. I used paru -Ps to help me find a large file. I picked /usr/lib/libVkLayer_khronos_validation.so which is 603MiB.
This test is not particularly representative is it uses userspace versions of the compression algorithms, kernel versions have different performance characteristics. Still, it’s easier to test the userspace versions, and that should give a rough idea.
❯ ./btrfs_compression_test.sh /usr/lib/libVkLayer_khronos_validation.so
[INFO] Using file '/usr/lib/libVkLayer_khronos_validation.so' as compression target
[INFO] Copying '/usr/lib/libVkLayer_khronos_validation.so' to '/tmp/tmp.zMRyhFKrGm/' for benchmark...
[INFO] Installing required utilities
[INFO] Testing compression for 'zstd'

 Level | Time (compress) | File Size Savings | Time (decompress)
-------+-----------------+-------------------+-------------------
     1 |          1.103s |           63.132% |            0.510s
     2 |          1.207s |           64.918% |            0.505s
     3 |          1.786s |           66.172% |            0.532s
     4 |          2.120s |           66.790% |            0.556s
     5 |          3.591s |           67.122% |            0.535s
     6 |          4.753s |           67.589% |            0.526s
     7 |          5.170s |           68.275% |            0.525s
     8 |          6.221s |           68.520% |            0.513s
     9 |          6.634s |           69.160% |            0.513s
    10 |          9.984s |           69.272% |            0.513s
    11 |         13.876s |           69.322% |            0.513s
    12 |         16.232s |           69.328% |            0.513s
    13 |         29.154s |           69.321% |            0.506s
    14 |         32.529s |           69.359% |            0.511s
    15 |         40.259s |           69.407% |            0.513s

[INFO] Testing compression for 'lzo'

 Level | Time (compress) | File Size Savings | Time (decompress)
-------+-----------------+-------------------+-------------------
     1 |          1.156s |           46.860% |            0.864s
     2 |          1.175s |           47.234% |            0.863s
     3 |          1.175s |           47.234% |            0.861s
     4 |          1.173s |           47.234% |            0.860s
     5 |          1.173s |           47.234% |            0.862s
     6 |          1.174s |           47.234% |            0.862s
     7 |         25.654s |           58.390% |            0.916s
     8 |         71.146s |           58.615% |            0.901s
     9 |         83.719s |           58.618% |            0.905s

[INFO] Cleaning up...
[ OK ] Benchmark complete!
According to this test, zstd:1 is the fastest option. I’m surprised zstd is now better than lzo in any circumstances. The script doesn’t say much about real life scenarios since payloads are stored in RAM. Therefore, to try to measure my disk’s impact, I modified the test by:
- Having the compress test writes to the disk and the decompress test reads from the disk.
- Adding a non-compressed read/write test using
dd. - Dropping the page cache before the test, and syncing to disk after the test.
Here are the new results:
 Level | Time (compress) | File Size Savings | Time (decompress)
-------+-----------------+-------------------+-------------------
     1 |          1.214s |           63.132% |            0.524s
     2 |          1.288s |           64.918% |            0.531s
     3 |          1.864s |           66.172% |            0.547s
     4 |          2.231s |           66.790% |            0.587s
     5 |          3.656s |           67.122% |            0.559s
     6 |          4.958s |           67.589% |            0.542s

[INFO] Testing compression for 'lzo'

 Level | Time (compress) | File Size Savings | Time (decompress)
-------+-----------------+-------------------+-------------------
     1 |          1.353s |           46.860% |            0.966s
     2 |          1.343s |           47.234% |            0.931s
     3 |          1.345s |           47.234% |            0.946s

[INFO] Testing dd

 Level | Time (compress) | File Size Savings | Time (decompress)
-------+-----------------+-------------------+-------------------
     1 |          0.745s |            0.000% |            0.333s
So even the fastest scheme slows down disk access. This is sort of a worst case scenario, however. Under real life heavy load, I expect (I hope) that multiple kernel threads will be involved, making the benefit larger as the SSD remains bottle-necked. And again, keep in mind that this uses userspace utilities instead of the kernel’s crypto API. To simulate the multi-kernel-threads hypothese, I modified the test again so that zstd uses 8 threads.
 Level | Time (compress) | File Size Savings | Time (decompress)
-------+-----------------+-------------------+-------------------
     1 |          0.307s |           63.132% |            0.518s
     2 |          0.339s |           64.918% |            0.585s
     3 |          0.517s |           66.172% |            0.574s
     4 |          1.020s |           66.790% |            0.580s
     5 |          0.937s |           67.122% |            0.542s
     6 |          1.071s |           67.589% |            0.554s
Given these few results, I decided on using zstd:1. A 63% space-saving is too good to miss, even if in the worst case, there may be a slight slowdown which should be compensated by a significant speedup under heavy disk load. By the way, I tried testing with other payloads, and those that compress better than 63% (like glibc at 85%) show even more enticing results.
Here is another interesting test:
https://gist.github.com/braindevices/fde49c6a8f6b9aaf563fb977562aafec
The author concluded that lzo was a better choice for fast NVME SSDs, but not by much. However, he did his test using kernel 6.0 and/or 6.1. Since then, in 6.2, and again in 6.8, the kernel’s zstd has been upgraded. The results were so close before, that I bet that zstd would win over lzo now, which is what my own userspace tests are indeed showing.
It’s a shame btrfs decided against integrating lz4, instead we have lzo that has been completely obsoleted even in its best case scenario.
Other options
archinstall already created a decent fstab, but it can be improved further.
nodiscard: This is redundant with thefstrimtimer described above. Has to be explicitly disabled since the default is nowdiscard=async.noatime: I don’t have any need for access times, so I disable them, which can save some writes on reads.x-systemd.automount: I added this flag to all non-root mount points. This speeds up the boot process by lazily mounting the marked partitions.
Note that I do not enable autodefrag. The feature (like regular defrags) has hard to grasp drawbacks. In short, defragmenting usually breaks reflinks. This means that if a snapshots references a file to be defragmented, after defragmentation, the snapshot, and the current file system version (and the future snapshots) may point to different on disk data, duplicating the space usage.
Take note that another btrfs gotcha is that most mount flags cannot differ between subvolumes. btrfs will only use the flags passed when mounting the first subvolume of an array.
TLP
TLP is a utility to help save battery on Linux laptop. By default, it doesn’t do much (USB, sound, and WiFi power saving, check with tlp-stat -c), but we can use it to guide the CPU power profile and enable more aggressive options.
❯ sudo pacman -S tlp❯ cat /etc/tlp.d/01-mine.conf
# The defaults are balance_performance, and balance_power which may actually be fine.
ENERGY_PERF_POLICY_ON_AC=performance
ENERGY_PERF_POLICY_ON_BAT=power
CPU_SCALING_GOVERNOR_ON_AC=schedutil
# amd-pstate mainly supports schedutil and ondemand for dynamic frequency control.
# https://www.kernel.org/doc/html/v6.6/admin-guide/pm/amd-pstate.html
# Empirically, powersave really limits too much while schedutil ramps up too much
CPU_SCALING_GOVERNOR_ON_BAT=ondemand
CPU_HWP_ON_BAT=power
PCIE_ASPM_ON_BAT=powersupersave
PCIE_ASPM_ON_AC=default
RADEON_DPM_STATE_ON_AC=performance
RADEON_DPM_STATE_ON_BAT=battery❯ sudo systemctl enable --now tlpFor the very similar Framework laptop, PPD is often recommended over TLP: https://knowledgebase.frame.work/en_us/optimizing-fedora-battery-life-r1baXZh. My understanding is that PPD can probably do more, than TLP, but is sufficient to me considering all my manual configuration. I may look at switching in the future.
Disable Webcam (temporary)
powertop reports power usage coming from the webcam, even when not in use. I am yet to use the webcam, so I simply disabled it until I find a better fix.
❯ cat /etc/modprobe.d/disable-webcam.conf
# Temporarily blacklisted to workaround https://gitlab.freedesktop.org/pipewire/pipewire/-/issues/2669
blacklist uvcvideo
powertop → kitty
I used to use alacritty as my terminal, but as part of my battery optimization with powertop, I discovered that it was at the time constantly doing background work, waking up the CPU, and using battery. kitty was fine however, so I switched to it. When revising these notes on 2024-05-02, I installed alacritty again, and couldn’t see this issue anymore, but for now, I’ll stay on kitty. My setup uses kitty’s single-instance mode which increases its efficiency even more.
Interrupts affinity optimizations
In powertop, I noticed that moving the mouse generates a lot of interrupts. To get more details, one can use a command such as watch cat /proc/interrupts. There I could confirm that touching the trackpad generates two kinds of interrupts, AMDI0010:00 and pinctrl_amd. The kernel thinking that will help performance distribute the two interrupts to two different CPU cores. However, especially, on a laptop, this is not the best decision. This is because touching the trackpad will wake up at least two cores from their deeper sleep levels. Considering that we know those two interrupts always come together, we can instruct Linux to handle them both on the same core.
❯ cat `/etc/tmpfiles.d/coalesce-touchpad-interupts.conf`
# This moves pinctrl_amd, AMDI0010:00 and amd_gpio to the same (CPU4) CPU core since both interupts are triggered from touchpad events.
w       /proc/irq/7/smp_affinity        -       -       -       -       00010
w       /proc/irq/10/smp_affinity       -       -       -       -       00010
Custom kernel
There are not always many good reasons to compile your own kernel, but here, I think there could be. First because the older the kernel, the more bugs can be fixed by backporting patches. Starting from Linux 6.9, I think there will be very few reasons to justify this argument for this laptop, however. The other reason is that ArchLinux’s (or CachyOS’s) kernels are not tuned for laptops, and we can do better. Finally, there are a bunch of patches lying around (Zen, Liquorix, Xanmod, Clearlinux) that may, or may not be worth having.
To tune a kernel for laptop, you want at the minimum:
CONFIG_NO_HZ_IDLE=y- A low
CONFIG_HZ. I use 100Hz CONFIG_PREEMPT_DYNAMICorCONFIG_PREEMPT_VOLUNTARY
To build my own kernel, I start from linux-tkg since it’s made for ArchLinux. Here is the configuration I use:
_git_mirror="github.com"
_menunconfig="false"
_debugdisable="true"
_lto_mode="thin"
_sched_yield_type="1"
_rr_interval="default"
_ftracedisable="true"
_tickless="2"
_compileroptlevel="2"
_processor_opt="zen4"
_smt_nice="true"
_timer_freq="100"
_default_cpu_gov="schedutil"
_aggressive_ondemand="false"
_custom_commandline=""
_NR_CPUS_value="$(nproc)"
Note that some of these settings are actually the default, but tkg’s build script prompt about them if unspecified.
On 6.9, I’m only currently using one patch.
kernel options
zswap.enabled=0
Fromarchinstall. Disablezswap(since we usezram) which is enabled by default on ArchLinux.rootflags=subvol=@
Fromarchinstall. Specify which subvolume to boot.rw
Fromarchinstall.rootfstype=btrfs
Fromarchinstall.quiet
Fromarchinstall.loglevel=3
Fromarchinstall.random.trust_cpu=on
Potentially less chance to block on low entropy.audit=0
Disable a noisy and unactionnable kernel log.mitigations=off
Read about this somewhere else.amd_pstate=guided
Enable the CPU to autonomously set its frequency according to within limits set by the OS. This mode provides the best performance per watt over passive and active.nowatchdog
May save some battery.pcie_aspm=force
Force enable PCI Express Active State Power Management for devices that don’t report support it. I didn’t actually check if this does anything. lspci can report the link state:sudo lspci -vv | grep 'ASPM.*abled;'amd_prefcore=enable
Enable the scheduler to favour the best cores reported by the CPU.rtc_cmos.use_acpi_alarm=1
See suspend-then-hybernateiomem=relaxed
Needed for ryzenadj.amdgpu.abmlevel=2
Battery saving technique that dynamically reduces the backlight depending on the content while adjusting the contrast to compensate. I found 3 to be too offensive, 2 looks fine. Starting from Linux 6.9 this will be adjustable at runtime.preempt=voluntary
Because the kernel is configured with CONFIG_PREEMPT_DYNAMIC, the kernel preemption mechanism can be chosen at boot time. It’s full by default:
❯ sudo dmesg | rg 'Dynamic Preempt'
[    0.050148] Dynamic Preempt: full
Voluntary means the kernel can preempt itself (let the CPU work on something else) only on explicit preemption points, while full means everywhere. full can help latency critical applications, but may lower throughput.
Here’s a short comparison: https://www.codeblueprint.co.uk/2019/12/23/linux-preemption-latency-throughput.html
IO scheduler
I want an efficient scheduler, but I also don’t want to use none, because I know I will manage to create disk starvation scenarios, and I don’t want my system to lose responsiveness in those moments. A good compromise is to avoid using bfq, because according to the kernel documentation, it is almost 3 times as slow as mq-deadline per IO. Even though IO starvation will happen, I expect this to be rare, therefore, the CPU price per IO of a heavier scheduler, like bfq, is unjustified.
To decide between kyber and mq-deadline, I referred to this study:
In this paper, we investigate if the Linux I/O schedulers fit modern NVMe SSDs. Our results show that BFQ and MQ-Deadline have significantly high CPU overhead and scalability issues caused by locking. Thus, we suggest that BFQ and MQ-Deadline should not be used with these SSDs. Kyber has lower CPU overhead than BFQ and MQ-Deadline with near-linear scalability and thus is the best fit of these SSDs.
This study’s limitation however is that it evaluates the kernel version 6.3.8 while recent changes have been made to
mq-deadline: https://lore.kernel.org/linux-block/[email protected]/?s=09bfq: https://www.phoronix.com/news/BFQ-IO-Better-Scalability
I cannot currently find these commits in Linux’s git, so for now, the conclusion is still valid.
The best way to configure the default scheduler is to use udev since it allows customization. Here’s how I did it:
/etc/udev/rules.d/60-schedulers.rules
# set scheduler for non-rotating disks
ACTION=="add|change", KERNEL=="sd[a-z]|mmcblk[0-9]*|nvme[0-9]*", ATTR{queue/rotational}=="0", ATTR{queue/scheduler}="kyber"
# set scheduler for rotating disks
ACTION=="add|change", KERNEL=="sd[a-z]", ATTR{queue/rotational}=="1", ATTR{queue/scheduler}="bfq"
bfq is still used on rotating medias since for them, starvation is more likely, and IO coalescing should be more beneficial. A similar argument could be made for slow USB drives, but at this time, I don’t have any specific rule for them.
udev rules can be reloaded and applied without rebooting:
❯ sudo udevadm control --reload-rules
❯ sudo udevadm trigger
sysfs can be used to confirm the rule works, or to easily experiment:
❯ cat /sys/block/nvme0n1/queue/scheduler
none mq-deadline [kyber] bfq
❯ echo none | sudo tee /etc/udev/rules.d/60-schedulers.rules
none
❯ cat /sys/block/nvme0n1/queue/scheduler
[none] mq-deadline kyber bfq
sysctls
sysctls are kernel parameters that can be modified at runtime. They can be read with sysctl a.b or applied immediately by using sysctl -w a.b=value. To make changes permanent, put them in a file in /etc/sysctl.d. Arch’s defaults are in /usr/lib/sysctl.d/.
vm.swappiness = 150
Yes, this goes completely the opposite way of the usual recommendation.vm.swappinessbiases the kernel towards dropping either anonymous pages (~apps) or filesystem pages under memory pressure. 100 is the middle ground. Dropping anonymous pages means moving them to a swap, while dropping file pages means files may have to be reread from disk later on, or Linux may more aggressively flush writes to disk. Neither is good. But this configuration useszramwhich means that swapping anonymous pages is very fast, much more than any disk access, so we want to bias towards that. In other words, a high value causeszramto get used more, which means more RAM saving, giving room for more filesystem caching, so, less disk accesses, and thus battery saving and performance.vm.page-cluster = 0
Configure how much readahead to do on swap accesses. Old trick that pretty much only makes sense on mechanical drives where fetching the next sector is so (comparatively) cheap that it makes sense to read more just in case. I’m not sure about SSD, but it’s been tested that forzram, it is indeed counterproductive: https://www.reddit.com/r/Fedora/comments/mzun99/new_zram_tuning_benchmarks/vm.dirty_writeback_centisecs = 1500
Recommended bypowertop. Triple the current default value.kernel.nmi_watchdog = 0
Recommended bypowertop.net.ipv4.tcp_slow_start_after_idle = 0
By default, Linux performs a TCP slow start after a connection has been idle for a single RTO. This seems excessive, and it’s therefore often recommended to turn this off. Example micro benchmark: https://blog.donatas.net/blog/2015/08/08/slow-start-after-idle/net.ipv4.tcp_mtu_probing = 1
Provide another method to detect and fix MTU issues. A value of 1 means it only triggers after detecting an ICMP blackhole, so no real drawback that I understand.net.ipv4.tcp_congestion_control = bbr
A much better TCP congestion algorithm. It doesn’t rely on packet loss to work. This is especially useful on lossy connections, like crappy wifi, since unpredictable packet loss won’t cause the (upstream) link speed to drop as much.kernel.core_pattern = /dev/null
Disable core dumps. See coredump.
60Hz
This laptop comes with a 120Hz screen that looks amazing but can be energy hungry. I’m using udev to automate reducing the frequency on battery.
❯ cat /etc/udev/rules.d/60-battery.rules
SUBSYSTEM=="power_supply",ENV{POWER_SUPPLY_TYPE}=="Mains",ENV{POWER_SUPPLY_ONLINE}=="0",RUN+="/usr/bin/on_battery.sh"
SUBSYSTEM=="power_supply",ENV{POWER_SUPPLY_TYPE}=="Mains",ENV{POWER_SUPPLY_ONLINE}=="1",RUN+="/usr/bin/on_ac.sh"

❯ cat /usr/bin/on_battery.sh
#!/bin/sh
set -e

if cd /tmp/hypr; then
    for i in */; do
        hyprctl -i ${i%*/} keyword monitor 'eDP-1,3200x2000@60,auto,1.6,vrr,1' >/dev/null || true
    done
fi

❯ cat /usr/bin/on_ac.sh
#!/bin/sh
set -e

if cd /tmp/hypr; then
    for i in */; do
        hyprctl -i ${i%*/} keyword monitor 'eDP-1,3200x2000@120,auto,1.6,vrr,1' >/dev/null || true
    done
fi
This does feel like a hack though, there must be a better way to start, let’s say, a systemd user service instead. This will be for another time though because this approach does work perfectly. I validated that the appropriate script applies correctly at boot as well.
Platform power limit
One cool feature of modern CPUs it that you can customize the power budget you wish to target, and the chip will automatically run as fast as it can under the limits. Here , someone benchmarked the impact of various settings, and above 5W, the lower the power limit is, the higher the performance per watt. For instance, limiting the CPU from 40W to 20W uses half the power, but keeps 80% of the performance.
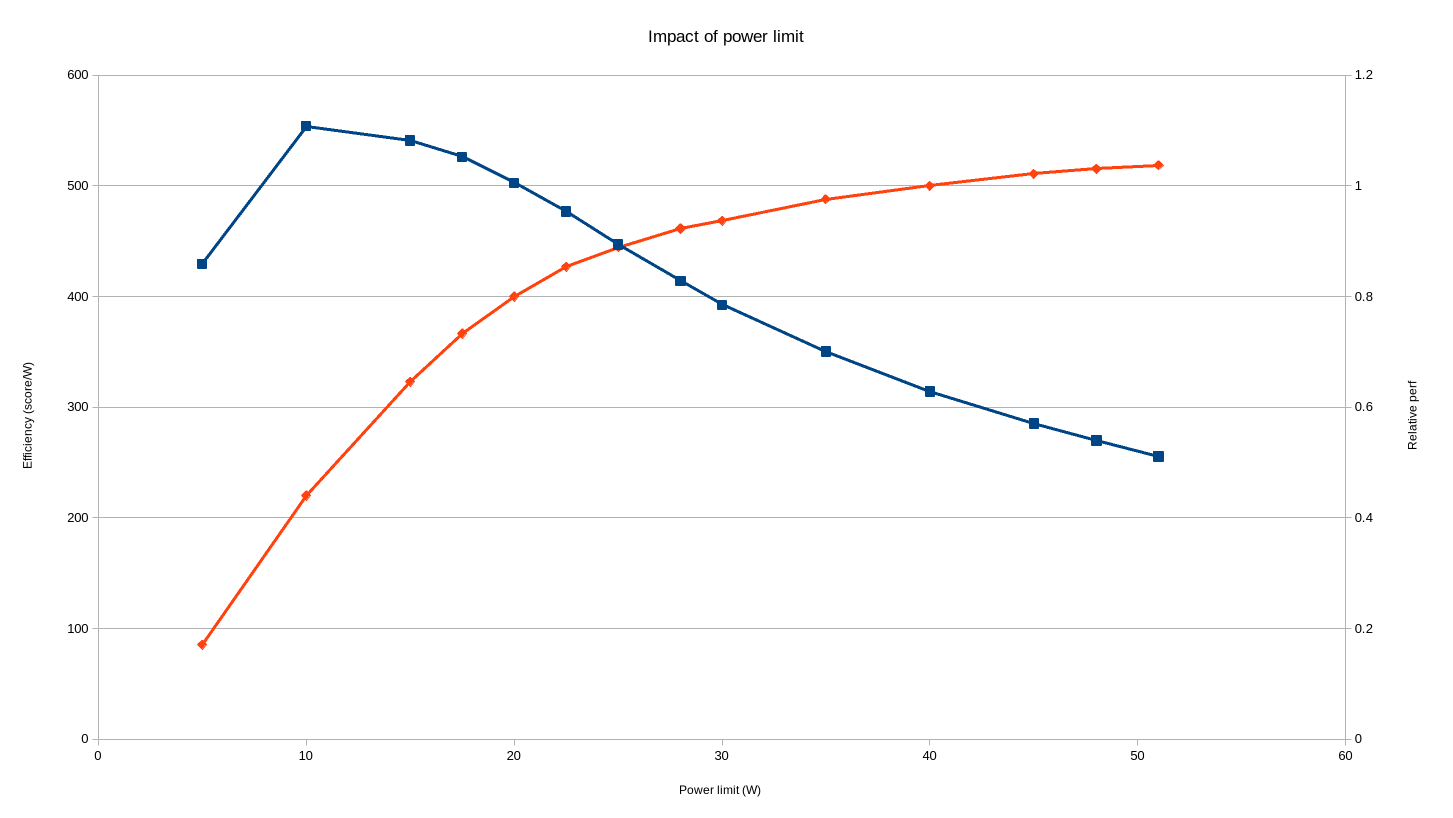
ryzenadj allows adjusting these limits, (and more) and is available on ArchLinux with the ryzenadj-git package. For the application to work, I had to [[#kernel-options|add iomem=relaxed to my kernel cmdline]]. A few limits can be customized, but I only changed slow-limit. The reason is that it’s the one that is relevant for long-term power saving. The fast-limit for instance prevents power spikes, but their impact is more about stressing power delivery components than long-term power usage. In fact, given the author of the benchmark above modified all three limits, I expect my own relative perf chart to look even better than his.
Validating that the setting does work:
# 45 Watts limit:
❯ cat /sys/class/power_supply/BATT/power_now
55737000
# 20 Watts limit:
❯ cat /sys/class/power_supply/BATT/power_now
28143000
This has been measured while compiling the Linux kernel.
To get the best of both worlds, I would like to use a higher limit on AC, than on battery. To automate the process, I added:
sleep 1
ryzenadj --slow-limit=20000
to my /usr/bin/on_battery.sh presented above.
On AC, I even decided on bumping the power limit to 50W (from 40W) by adding these lines to /usr/bin/on_ac.sh.
sleep 1
ryzenadj --slow-limit=50000
I don’t know why the sleep is necessary here. This is a bit of a hack that will need to be revisited at one point.
Space-saving
This laptop has an SSD on the smaller side, but 512 GB can be stretched quite a bit by being careful.
Simply using ArchLinux helps a lot since everything installed will come from an explicit decision.
Compression
Compression massively helps. Its effect can be measured by using compsize.
❯ sudo compsize -x /
Processed 207904 files, 120505 regular extents (126689 refs), 95906 inline.
Type       Perc     Disk Usage   Uncompressed Referenced
TOTAL       74%      6.4G         8.7G         9.7G
none       100%      4.2G         4.2G         4.7G
lzo         51%      2.0G         4.0G         4.6G
zstd        33%      156M         465M         466M
(The above has been measured before making the decision to switch from lzo to zstd)
Snapshots
Snapshots, as configured in Backups, do take space, but it shouldn’t be too much considering that they basically only store the diff with the currently live filesystem tree. Still, stuff like frequently replacing a large file could cause them to grow. btrfs makes it very hard to know snapshots’ size. Quotas need to be enabled, which has a performance impact, so try to avoid getting in a situation where you believe snapshots are using too much space, because once there, it’s a PITA. To avoid having snapshots taking too much place:
- Exclude unimportant folders from backups. See Backups.
- Limit the number of snapshots btrbk keeps locally. See Backups.
- Don’t defrag, as this breaks reflinks. See BTRFS filesystem.
paccache-hook
On my other PC, I used to call:
❯ sudo paccache -ruk0
❯ sudo paccache -rk1
when I felt it was time to do some cleanup. These two commands respectively, delete all uninstalled packages, and all outdated installed packages. On this new laptop, I looked at automating this process, and thankfully, the package paccache-hook does exactly the above in its default configuration. Installing the package is all that is needed.
coredump
By default, ArchLinux saves coredump using systemd-coredump. Coredumps for some programs can be huge and accumulate if not periodically cleaned. Moreover, from experience dumping a huge coredump to disk can negatively affect an already stressed system. I’m not going to debug using coredumps on this computer, so I may as well disable them to avoid those issues. This can be achieved in many ways. I added kernel.core_pattern = /dev/null to my /etc/sysctl.d/99-sysctl.conf.
systemd-journal
systemd’s journals can also accumulate over time up to a certain limit, which is 4GB by default. 4GB is not a huge amount, but is excessive for a laptop (servers can generate a much higher log volume). To fix my own limit, I created /etc/systemd/journald.conf.d/custom.conf with this content:
[Journal]
SystemMaxUse=100M
MaxRetentionSec=1week
tmpfiles
ArchLinux puts /tmp on a ramdisk by default, so nothing accumulates there in the long run. This is not the case in other temporary folders. After setting up the other space-saving mechanisms above, I found out that pretty much the only other directory that is still at risk of growing out of control is ~/.cache. We can automate its cleaning using systemd-tmpfiles.
❯ systemd-tmpfiles --user --cat-config
# /home/jerome/.config/user-tmpfiles.d/cache.conf
# Delete directories in .cache whenever they have not been used in 30 days.
# Doesn't work if .cache is a symlink, even when using a trailing slash.
e %C - - - ABCM:30d -
❯ systemctl --user enable --now systemd-tmpfiles-clean.timer
This didn’t work at first, because I configured .cache as a symlink to a snapshot excluded folder. Replacing the link with a bind mount defined in my fstab worked perfectly:
/mnt/btr_pool/@home-jerome-nobackup/.cache /home/jerome/.cache none bind,x-systemd.automountI should have taken a screenshot, but when I was done setting up my laptop, I was using under 3GB of disk, everything included.
pigz
Fewer and fewer programs are using gzip, but script that still do can be sped up by substituting gzip with pigz, a multithreaded implementation. The pigz-gzip-symlink package takes care of it.
UEFI
Smokeless_UMAF is an alternative UEFI menu that gives access to hidden platform configuration. At this point, I only tried playing with the UMA memory limit, which doesn’t save properly. Other settings might work better.
Last step: defrag+balance
Now that we are done, let’s make sure that everything is efficient by doing a one-time defragmentation and balancing. Yes, this has consequences, this breaks reflink, but at this point, the computer is fresh so we are better doing it now, when we are not using much space, and have few snapshots.
sudo btrfs filesystem defragment -r -czstd /
sudo btrfs filesystem defragment -r -czstd /home
sudo btrfs balance start -dusage=50 -dlimit=2 -musage=50 -mlimit=4 /
Conclusion
Idle power usage is 4W, which translate to 18 hours of autonomy for a 72Wh battery. Note that although Xiaomi advertises the laptop as having a 72Wh, the firmware actually reports 75Wh!
❯ cat /sys/class/power_supply/BATT/power_now
3990000
❯ cat /sys/class/power_supply/BATT/energy_full
74698000- Find my dotfiles here: https://github.com/jdecourval/dotfiles
- My package list
- My sysctls
- My fstab
- My kernel command line
Appendix
PowerTOP 2.15     Overview   Idle stats   Frequency stats   Device stats   Tunables   WakeUp

The battery reports a discharge rate of 3.48 W
The energy consumed was 81.1 J
The estimated remaining time is 11 hours, 30 minutes

Summary: 196.6 wakeups/second,  0.0 GPU ops/seconds, 0.0 VFS ops/sec and 2.1% CPU use

Power est.              Usage       Events/s    Category       Description
 25.2 mW      0.7 pkts/s                Device         Network interface: wlp1s0 (mt7921e)
    0 mW      5.2 ms/s      60.3        Interrupt      [71] amdgpu
    0 mW      1.9 ms/s      0.10        Process        [PID 1854] powertop
    0 mW      1.5 ms/s       3.7        Process        [PID 1199] Hyprland
    0 mW      1.2 ms/s      0.05        Process        [PID 837] [kworker/u64:11]
    0 mW      1.2 ms/s       0.7        Process        [PID 1486] /usr/bin/python /usr/bin/blueman-tray
    0 mW      0.8 ms/s       6.0        Interrupt      [7] sched(softirq)
    0 mW      0.8 ms/s      26.9        Timer          tick_nohz_handler
    0 mW      0.8 ms/s       1.1        Process        [PID 1264] waybar
    0 mW      0.7 ms/s      60.9        kWork          dbs_work_handler
    0 mW    466.2 µs/s      0.00        Process        [PID 12] [kworker/u64:1]
    0 mW    462.8 µs/s      0.10        Process        [PID 123] [khugepaged]
    0 mW    419.0 µs/s      0.00        Timer          hrtimer_wakeup
    0 mW    400.5 µs/s       0.9        kWork          pci_pme_list_scan
    0 mW    301.5 µs/s      0.00        Interrupt      [1] timer(softirq)
    0 mW    285.2 µs/s      0.00        Timer          delayed_work_timer_fn
    0 mW    269.9 µs/s       0.4        Process        [PID 326] [btrfs-transacti]
    0 mW    254.7 µs/s      0.00        Process        [PID 144] [kworker/6:1]
    0 mW    249.9 µs/s       1.8        Interrupt      [6] tasklet(softirq)
    0 mW    244.9 µs/s      0.10        Process        [PID 381] /usr/lib/systemd/systemd-journald
    0 mW    215.8 µs/s      0.00        Process        [PID 340] [kworker/u64:8]
    0 mW    196.6 µs/s      0.00        Process        [PID 242] [kworker/7:2]
    0 mW    194.7 µs/s      0.00        Process        [PID 925] /usr/bin/wpa_supplicant -u -s -O /run/wpa_supplicant
    0 mW    185.2 µs/s      0.00        Process        [PID 149] [kworker/11:1]
    0 mW    177.1 µs/s      0.25        Process        [PID 873] /usr/bin/NetworkManager --no-daemon
    0 mW    175.8 µs/s       2.2        Process        [PID 1278] /usr/bin/python /usr/bin/blueman-applet
    0 mW    144.7 µs/s      0.00        Process        [PID 1418] /usr/bin/gammastep -v
    0 mW    139.9 µs/s       0.3        Process        [PID 856] /usr/bin/NetworkManager --no-daemon
    0 mW    127.0 µs/s      0.00        Process        [PID 9] [kworker/0:1]
    0 mW    125.0 µs/s      0.00        Process        [PID 148] [kworker/10:1]
    0 mW    117.6 µs/s       4.7        kWork          amd_sfh_work_buffer
    0 mW    104.2 µs/s       2.3        Process        [PID 854] dbus-broker --log 4 --controller 9 --machine-id f20017236fda46108b40370a84029946 --max-bytes 536870912 --max-fds 4096
    0 mW     98.1 µs/s      0.20        Timer          timerfd_tmrproc
    0 mW     92.0 µs/s       0.9        Process        [PID 18] [rcu_preempt]
    0 mW     86.4 µs/s      0.00        Interrupt      [9] RCU(softirq)
    0 mW     74.5 µs/s      0.00        Process        [PID 263] [kworker/12:2]
    0 mW     72.8 µs/s      0.05        Process        [PID 1491] /usr/bin/zsh
    0 mW     60.2 µs/s      0.00        Timer          clocksource_watchdog
    0 mW     54.5 µs/s      0.20        Process        [PID 662] [napi/phy0-323]
    0 mW     53.5 µs/s      0.00        Process        [PID 1655] /usr/share/zsh-theme-powerlevel10k/gitstatus/usrbin/gitstatusd -G v1.5.4 -s -1 -u -1 -d -1 -c -1 -m -1 -v FATAL -t 3
    0 mW     53.4 µs/s      0.15        Process        [PID 1327] /usr/lib/xdg-desktop-portal
    0 mW     52.9 µs/s       0.6        Process        [PID 660] [napi/phy0-321]
    0 mW     52.1 µs/s      0.10        Process        [PID 1555] /usr/share/zsh-theme-powerlevel10k/gitstatus/usrbin/gitstatusd -G v1.5.4 -s -1 -u -1 -d -1 -c -1 -m -1 -v FATAL -t 3
    0 mW     49.9 µs/s      0.20        Interrupt      [70] mt7921e
    0 mW     48.7 µs/s      0.00        Process        [PID 644] [kworker/8:2]
    0 mW     42.7 µs/s       0.7        Process        [PID 857] /usr/lib/bluetooth/bluetoothd
    0 mW     39.7 µs/s       3.7        kWork          psi_avgs_work
    0 mW     36.6 µs/s      0.00        Timer          fq_flush_timeout
    0 mW     34.5 µs/s      0.00        Process        [PID 29] [kworker/2:0]
    0 mW     34.0 µs/s       1.7        kWork          blk_mq_run_work_fn
    0 mW     33.2 µs/s       0.9        kWork          drm_sched_run_job_work
    0 mW     33.2 µs/s      0.00        Process        [PID 152] [kworker/14:1]
    0 mW     31.7 µs/s      0.10        Process        [PID 1282] nm-applet
    0 mW     30.0 µs/s      0.00        Timer          process_timeout
    0 mW     29.9 µs/s       2.4        Interrupt      [58] nvme0q12